Decrypting SSL/TLS #1: Configuring Wireshark
*This article is an English translation of the Engineer Notes article as of Oct 4, 2022.
*Please note that the content may have been updated since then.
Recently, the entire web has become encrypted. This means that the risks of impersonation, eavesdropping, and tampering are reduced, which is reassuring for users.
However, for administrators, it is a troubling issue as they cannot understand what kind of interactions are taking place due to encryption. It is also heard that attacks leveraging encryption, such as hiding malware within communications for drive-by downloads, have been increasing recently.
The web communications familiar to everyone are encrypted with a protocol called TLS (Transport Layer Security) between the server and the client.
This time, I will explain the decryption settings of the captured TLS protocol with Wireshark. We are using Wireshark version 3.6.8 (the latest stable version as of now).
Table of Contents
SSL/TLS is a protocol with a long history and depth, so this explanation is divided into three parts.
Evolution of SSL/TLS Versions
TLS is the name of the protocol used to encrypt data exchanged over the network. Initially, it was called the SSL (Secure Socket Layer) protocol.
SSL was originally developed by Netscape. SSL 1.0 was found to have major flaws before its release and was never published, leading to SSL 2.0. Further vulnerabilities were discovered, and SSL 3.0 was released after a redesign.
After that, SSL was transferred to the IETF for development with the involvement of security experts, leading to the release of TLS. TLS 1.0, TLS 1.1, and TLS 1.2 were upgraded versions, and in 2018, TLS 1.3 was released as RFC8446.
The actual difference between SSL 3.0 and TLS 1.0 is slight, but they are not compatible. The reason for using "SSL/TLS" together is that the name SSL was already widely used when TLS appeared.
Share of SSL/TLS Version
The global trends in SSL/TLS can be viewed on Qualys SSL Labs.
The graph below shows the support status of various SSL/TLS versions based on a survey of 150,000 websites by SSL Labs.
Source: Qualys SSL Pulse September 04, 2022 Scan
Protocol Support
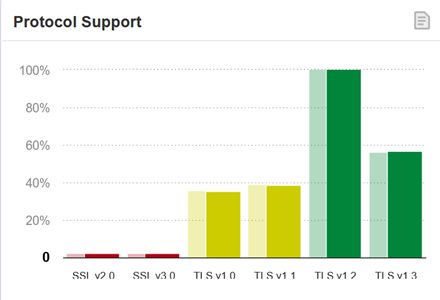
TLS 1.2 is supported by 99.8% of sites
TLS 1.3 is supported by 56.9%, exceeding half
On the other hand, non-recommended versions TLS 1.0 and TLS 1.1 are still not disabled on about 40% of sites
Best Protocol Support
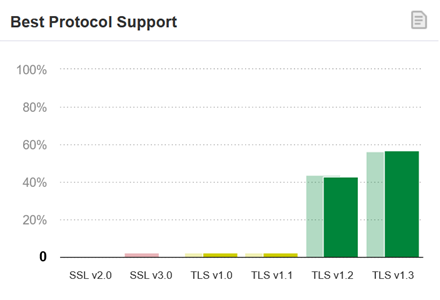
TLS 1.2 is used by 42.9%, TLS 1.3 by 56.3%, surpassing TLS 1.2
Support for versions up to TLS 1.1 is rare
It appears that TLS 1.3 has become quite popular.
On Qualys SSL Pulse, you can check the support status of SSL/TLS as well as the support status of HTTP/2 and SPDY.
How to Decrypt TLS with Wireshark
There are two ways to decrypt TLS with Wireshark.
- Register the server's private key
- Register the Pre-Master Secret for each session
The first method allows for decryption even after capturing the traffic by registering the private key.
The second method is troublesome. It involves exporting the Pre-Master Secret for each session from the TLS-communicating client (specifically, the client's browser) and loading it into Wireshark for decryption. Since the Pre-Master Secret changes with each session, if you capture without setting the Pre-Master Secret, you cannot decrypt it later.
However, the first method is only possible if the key exchange method is RSA.
In TLS 1.3, only Perfect Forward Secrecy (PFS) ciphers are used, so RSA is not supported. Moreover, since most websites on the internet use DH-based key exchanges (including DHE and ECDH), the first method cannot be realized.
For more details, refer to the Wireshark Wiki TLS.
Steps to Decrypt TLS with Wireshark
TCP Settings
First, configure the TCP settings. You must follow these steps for either method to successfully decrypt.
- Launch Wireshark and go to [Edit] menu > Preferences > Protocols > TCP.
- Check "Allow subdissector to reassemble TCP stream" and "Reassemble out-of-order segments."
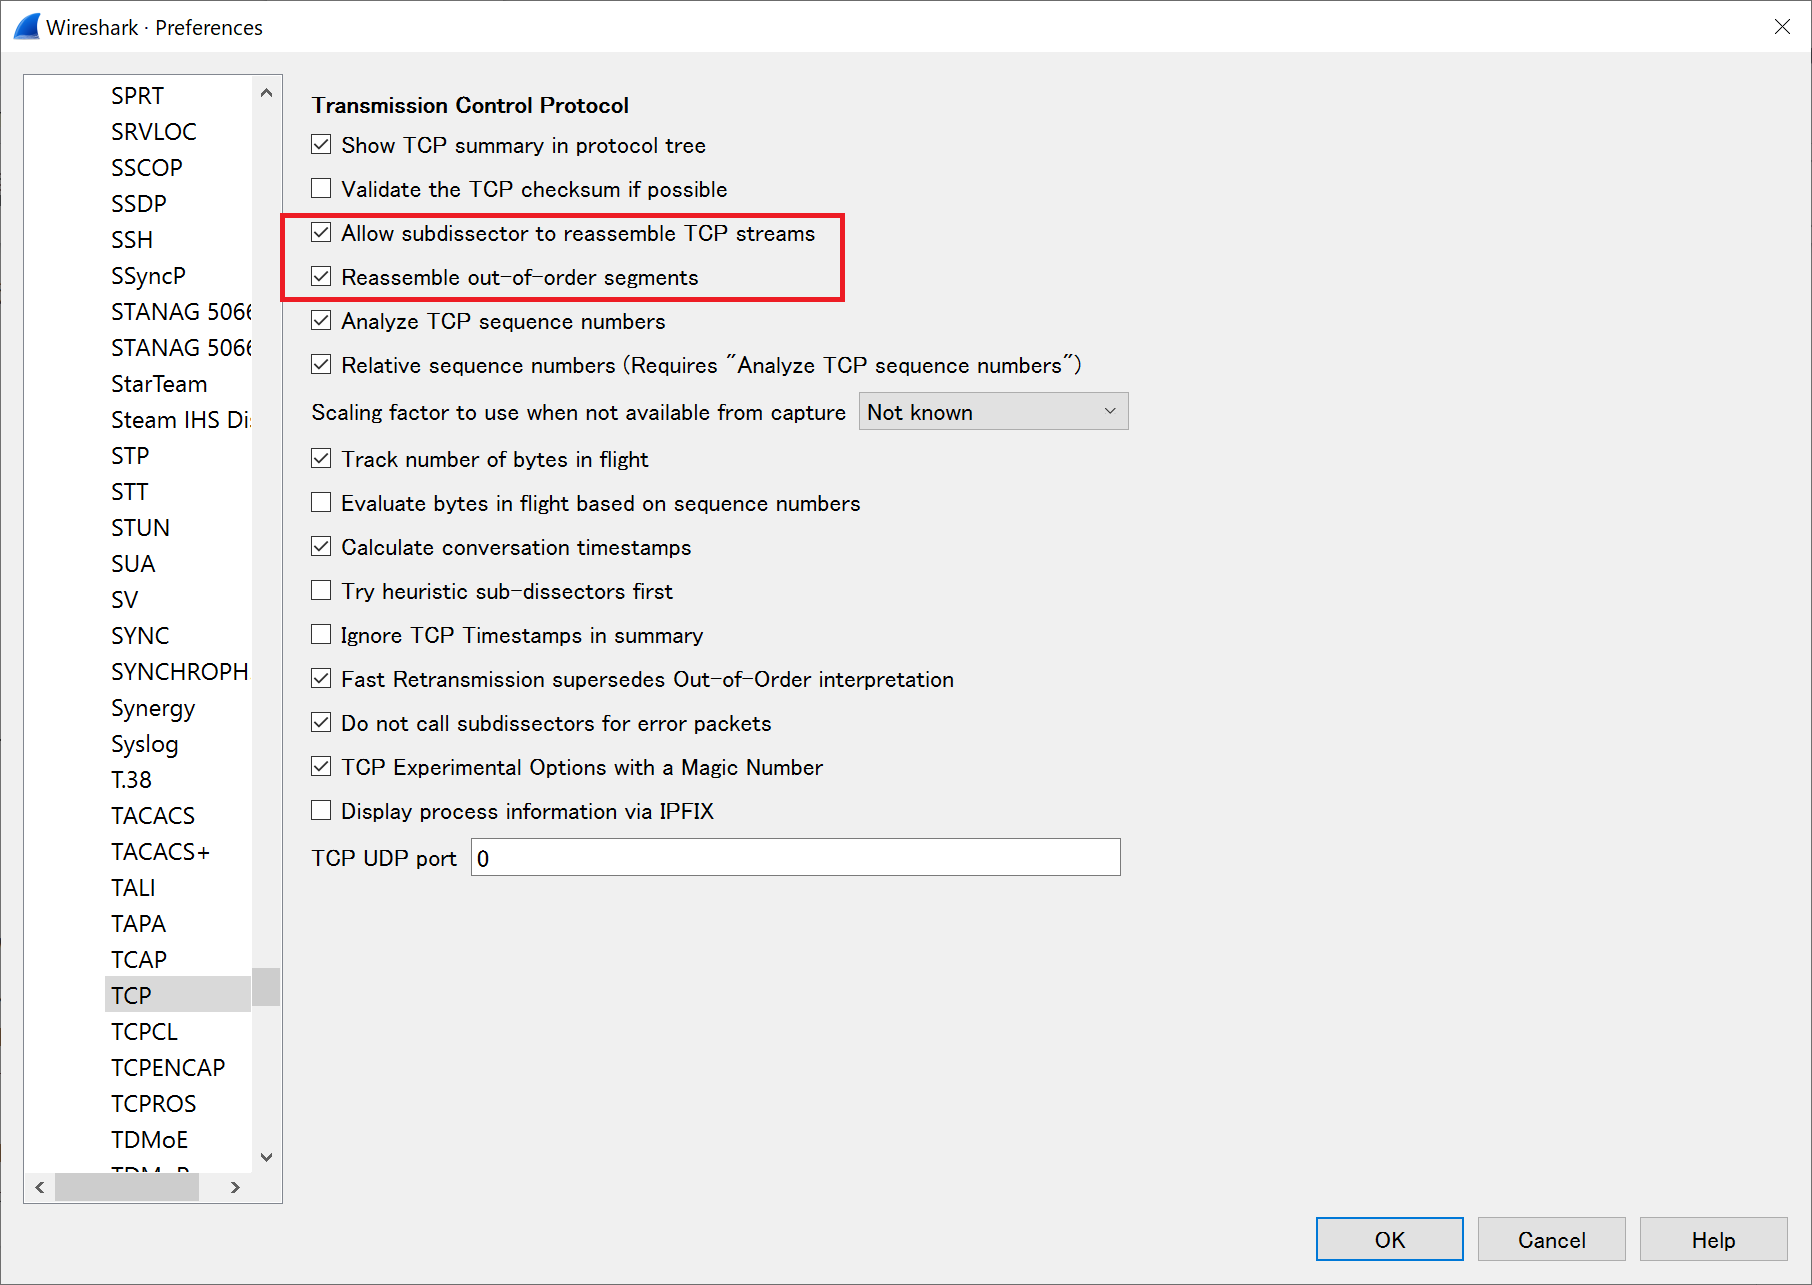
"Reassemble out-of-order segments" is disabled by default in Wireshark V3.0 and later. Without this setting, out-of-order data on TCP will not be decrypted.
Decrypting by Registering the Server’s Private Key
- Launch Wireshark and go to [Edit] menu > Preferences > Protocols > TLS.
- Click the [Edit] button under "RSA keys list" and set the following items by clicking the + button.
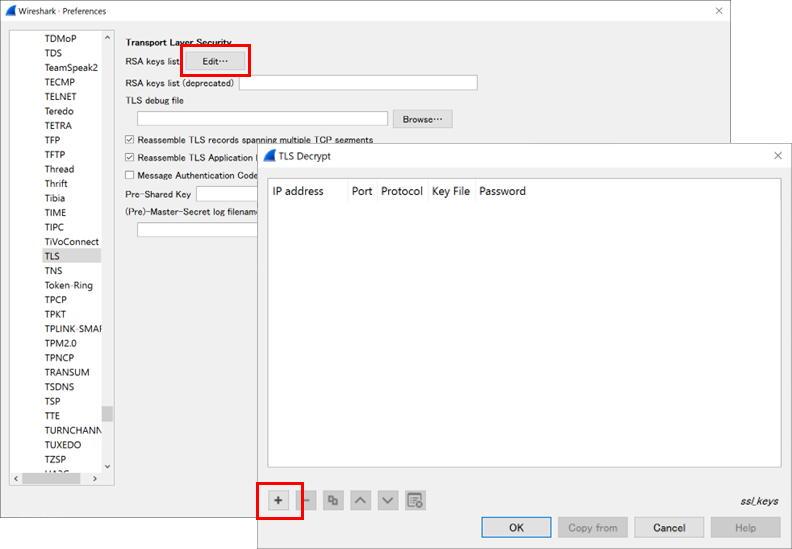
| Item | Description |
|---|---|
| IP address | Enter the server's IP address |
| Port | Enter the server's port number, usually "443" for HTTPS |
| Protocol | Enter the protocol name as Wireshark's dissector name, usually "http" for HTTPS |
| Key File | Enter the file path of the private key |
| Password | (If the private key is passphrase-protected) Enter the passphrase |
This method is limited and can only decrypt in specific situations.
- The cipher suite selected by the server is not using (EC)DHE.
- The protocol version is SSLv3, (D)TLS 1.0-1.2. It does not work with TLS 1.3.
- The private key matches the server certificate. It does not work with the client certificate, nor the Certificate Authority (CA) certificate.
- The session has not been resumed. The handshake must include the ClientKeyExchange handshake message.
Note that the Wireshark Wiki does not recommend registering RSA keys from the TLS screen and suggests using [Preferences > Protocols > RSA Keys] instead.
With Wireshark Ver.3.6.8, decryption worked without any issues when registered from the TLS screen. This setting method might change in future updates, so please be aware.
Decrypting by Registering the Pre-Master Secret for Each Session
For HTTPS communication via a browser, set the environment variable `SSLKEYLOGFILE` to write the TLS session keys to a specified file, which Wireshark can then read for decryption. This method is confirmed to be supported by Chrome, Firefox, and Chromium-based Microsoft Edge.
- Set the environment variable. In Windows, search for "System Properties" and select "Advanced."tab. And click the [Environment Variables...] button.
- Add a system environment variable. Click [New] and enter "SSLKEYLOGFILE" as the variable name and specify the output file path. (e.g., `C:\work\tlskey.txt`)

- Click [OK] and restart the OS.
- Launch the browser and confirm the creation of the specified file.
- Start capturing in Wireshark and connect to the desired web server.
- After communication ends, close the browser and stop capturing.
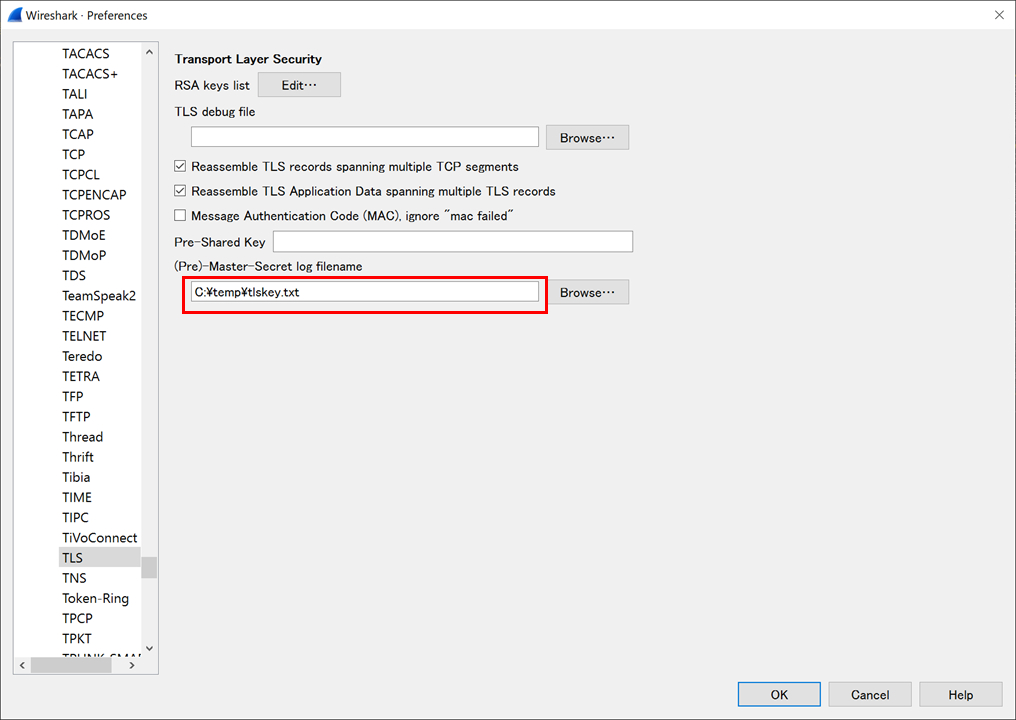
- In Wireshark, go to [Edit] menu > Preferences > Protocols > TLS and enter the output file path from step 2 under "(Pre)-Master-Secret".
Afterword
I explaine the evolution and current status of SSL/TLS and how to configure Wireshark to decrypt TLS.
Netx, I will explain the results of capturing and examining communications between a client and a web server using SYNESIS by registering the Pre-Master Secret for each session.

